Where do I get materials from?
The audio should come from the picture sequence by a format called AAF. If you’re not familiar with AAF or the process of opening and “splitting” one, check out my blog post: Post-Production Basics: What Is An OMF Or AAF, And Why Does It Matter?
Indie Projects
If you’re working on indie projects, it may fall between you/your sound team and the picture editor to get the AAFs you need to work. It is a common challenge for indie editors (especially those who have never worked with an audio person before) to not know how to create AAFs. Picture editors who don’t know how to make AAFs may try to get creative and suggest other “easier” ways to get you audio. AAF is the professional file exchange format; don’t settle for any other solutions. There’s a couple problems that come along with using AAFs: Editors using Adobe Premiere encounter a lot of AAF bugs and Final Cut can’t even create an AAF for editors on Final Cut X (the feature was removed). There are ways for Final Cut editors to do it including X2Pro software. As a sound editor (or mixer), it’s not your responsibility to create AAFs or figure it out for them but it is common to have to help picture editors understand what they need to do and troubleshoot any problems that come up with the AAFs they create for you.
Sound teams/Studios
If you’re working with a sound team (like at a studio), you may receive the original AAF files to work with or you may get a Pro Tools session. There may have a support staff (machine room or assistants) who are responsible for getting AAFs from the client and opening them to check everything worked. Sometimes the support staff will split out all the materials, also, so you will receive a session with only the dialog tracks. If you’re not sure, it’s ok to ask who will be splitting the AAF or if it’s your job.
If you are doing the whole project yourself, it’ll be your responsibility to open and split the AAF so every element goes to the proper track.
Picture
Sometimes the video will be included in the AAF and other times it will be sent by the picture editor as a separate Quicktime. If it’s a Quicktime, you’ll have to import it into your session and place it on the timeline. If it has burn-in timecode (timecode running on screen), spot check that the burn in matches the Pro Tools timecode. If it doesn’t, this is a sign you may be working at the wrong frame rate or your video isn’t placed correctly.

If there is no burn-in timecode, check for a 2-pop in the AAF and picture. There will literally be a “2” in the Quicktime and the AAF will have a frame of tone (sine wave). In television, the two pop should be at 59:58:00 of the hour (00:59:58:00, 01:59:58:00, etc). In film, the two pop may be at six seconds (ie, 1:00:06:00, 2:00:06:00). If there’s burn in and a two pop, check both. If anything doesn’t line up exactly (even off a frame), it’s a red flag that something may be wrong with the materials, frame rate, etc.

Example of a 2-pop in Pro Tools
If you didn’t get a 2-pop or burn in timecode, try the Quicktime at the hour (1:00:00:00) and see if it lines up with the AAF. If the AAF is not at the top of the hour, the Quicktime may start at the first frame of audio in the AAF.
You can see why it’s so important for picture editors to have a professional understanding of how to deliver materials to audio. An experienced editor will probably deliver with burn-in and two-pop so you can figure it out yourself quickly AND troubleshoot that it’s correct. If you place the Quicktime incorrectly (or the editor output materials incorrectly), it can cause major issues down the road. If you’re editing ADR or moving dialog because of sync issues and it turns out your picture isn’t in sync to begin with, it can create a nightmare down the road to fix.
Organizing materials
There’s a lot of ways to do this but this is my preferred folder structure (The project is called “APP”):

Basically, there’s one main folder for the project then a separate folder for each task. Inside each of those folders has any sessions related to that element (mix, edit, etc). I use “Sources” for AAFs (the raw files from the editor and the Pro Tools session created from them) and any other files sent by the client (music tracks, fixes, etc).
Naming Sessions
There’s no norms here but here’s my rule of thumb: Everything should be clear enough that if someone else had to pick up on your project, they could look through your files and figure it out without having to ask you.
If you’re working for a studio or company they may have a naming convention (it’s a good question to ask anytime you’re working for someone else). In general, a good session name should include the project title (full or abbreviated), task, and version number or date. I like to add “FINAL” or “delivered” to the final one so it’s clear what was the final version. Initials are good to add if there are multiple editors. Here’s a couple examples:
- Mr Returns_Dia Edit_01
- ADDR Ep1 Dialog Edit AT v2
- 011019_Creature 101_AAF split
- Alpha Ep 2 Dia Edit FINAL
Here’s what a simple project looks like with a clear naming convention:

When I’m working, I’ll do numbering like “Edit 01”, 02, 03 etc and save a new one when I either hit an important point or at the beginning of the day.
File organization and file management is extremely important. If a session file gets lost or is named poorly it can be a challenge to figure out especially if it’s been some time (weeks or months) since you worked on it. And again, if you ever had to hand over your session to someone else, they should be able to figure it out without having to ask you.
Session Layout
In this video, Roy Vargas goes over the basic session layout of a Pro Tools session for post-production.
Prepping the session
You can edit dialog in one of two ways: starting with the AAF session and adding your own tracks; or starting with a dialog editing template and import the AAF tracks into your session.
If you are using your own session (or template), make sure that the frame rate is the same as the AAF. While the norm for many tv and film projects is 23.97, occasionally you may receive a project at 29.97 or 24.
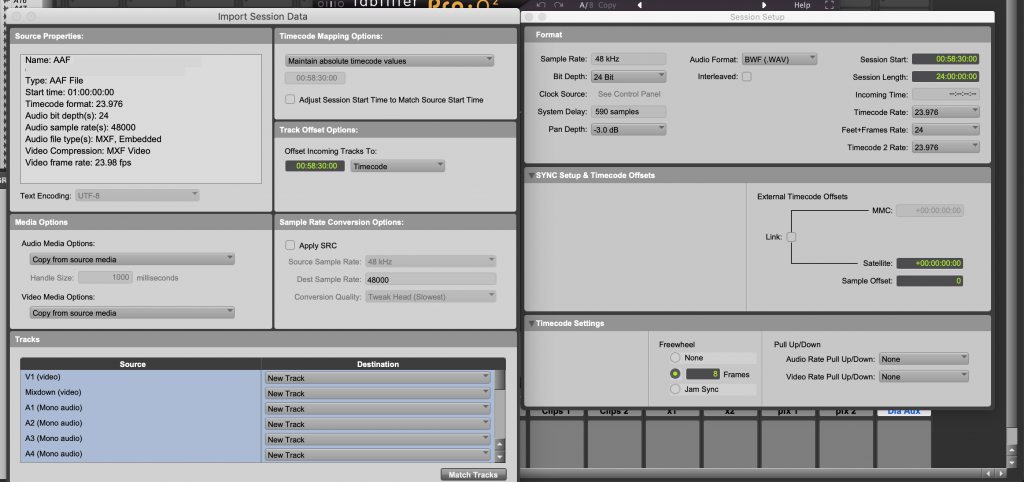
Left side: AAF info (using “Import Session Data”); Right side: “Session Setup” window in Pro Tools. Timecode Rate (upper) is the session time code.
Before you start editing, you should:
- Double check your AAF tracks have volume information. Go into volume view and make sure it’s there. If you or your mixer wants to wipe out volume automation down the road, that’s very easy to do. Getting volume automation back after you’ve edited an AAF and moved tracks around – you might as well start from scratch. Some resources will say to get rid of it but don’t. Let the mixer get rid of themself, if they don’t want it.
- Save your session with a new name (ie, if your session was named “AAF Split” rename “Edit 01”)
- Duplicate the original AAF tracks to keep for reference. If you have any sort of accident (like you accidentally move a region out of time or delete) this makes it easy to check or recover what you may have lost.

In this screenshot, all the AAF tracks have been duplicated. Then, the original tracks (A1-A18) will be hidden and made inactive.
4. Add all the tracks needed to do your dialog edit. This includes mono dialog, stereo dialog (sources that are stereo, like mixed movies or news), pfx, x tracks.

The tracks used in this screenshot are for a very basic setup. You may need more dialog tracks, interview tracks, no clips tracks, etc depending on the project. You can also import tracks from another session so you don’t have to create it all from scratch.
5. Add a dialog aux and route all the dialog tracks there (stereo if you are working in stereo; 5.1 if you are setup to work and monitor in 5.1). Make this aux “solo safe” (on Mac, command-click on the “s” on the track)


Adding EQ and Compression
While it’s not necessary for dialog editing, adding EQ and compression to your edit tracks (for temporary use) can help you hear dialog closer to how the mixer will be hearing it. The idea is to hear things that you may not catch otherwise. For example, a lav may sound dull and boxy while editing but the mixer might add 6 dB of high end boost to make it sound better. That’s a lot of boost – the difference between hearing some problems (like pops, clicks or noises) or not.
Setting temp EQ or compression shouldn’t be done to the level of detail that it slows you down from editing. But, even broad/quick adjustments can help you edit. Put an EQ on each track, leave it flat, and quick make adjustments before you start working on a scene.

FabFilter Pro-Q is a popular EQ option for post-production, but for this purpose, even the EQs that come with Pro Tools will work fine.
For compression, I like using the plugin Waves MV2 on a dialog aux while editing dialog. It helps compress the dialog some (to make it sound closer to how it will in the mix) but is very easy to adjust and it’s pretty transparent. Plus, Waves often has it on sale for 50% or more.

Headphones versus studio monitors
This is a personal preference, but I usually prefer headphones to do my basic edit unless I’m working in a studio with full-range monitors that I know and trust. It’s hard to hear rumble on a speaker that only has a 6 inch woofer, for example. My go-to headphones are Audio-Technica ATH-M50x.
If I’m working at a studio, I’d rather edit on a mix stage than an edit bay (it’s not always possible but it’s really helpful if you have the option). Even better is to edit in the mix room that the final mix will take place. The mic choices that you make in one room may sound very different in another – especially between a small edit room and a mix bay.
Backups
Don’t forget to backup your work! Your work drive and backup drive should be completely independent. If your work drive (or your backup drive) fails, you need to be able to access the other quickly so you can start working ASAP. There’s times where getting the work done will be more important to meet a deadline than to fix a broken drive. Dropbox and Google Drive are a good backup option in a pinch – or can be used for a second backup.
- Part 1: Why Learn Dialog Editing?
- Part 2: The Elements of Dialog and Voiceover
- Part 3: The Challenges of Dialog Editing & Mixing
- Part 4: Stems and Specs for Dialog Editors
- Part 6: Dialog Editing Basics
- Part 7: Dialog Organization for Different Projects
- Part 8: Other Responsibilities for the Dialog Editor
- Part 9: Frankenbites
- Part 10: Delivery